Showing posts with label makeup tip. Show all posts

Wednesday, October 8, 2014

How To Apply Lipstick Like A Pro


perfecting your pout (aka lipstick) is more than just picking the perfect color. have perfectly luscious lips - even when they are pencil thin like mine - is completely attainable. sure it involves a few more steps than your typical swipe of lipgloss but believe me, your instagram/husband/boyfriend/SO/pictures will thank me.

so how do you take drab lips to fab lips? it begins with a good concealer pencil. my favorite is the NYX Wonder Pencil - a really inexpensive product that works amazingly well. can i tell you how ridiculously excited NYX is beginning to be sold in Target?! my two favorite things in one place! adding a concealer pencil above your natural lip-line will highlight the area, making it appear slightly raised which gives the appearance of a fuller top lip.

second is your typical lip pencil/lipstick/gloss trio. everybody does it, but make sure you take these steps when doing it. first, apply a lip liner that is darker than your lip color making sure to fill in the outer corners of your lips. you want the darker color to be on the outside and the lightest color on the inside. this too gives the illusion of fullness. fill in the center of your lips with your lip color and apply your gloss only to the center of your lips as well.

last you want to make sure you finish with a bronzer. adding a touch of bronzer below your bottom lip will make it appear poutier and fuller. a small step that goes a long way.

you are now on your way to fuller, poutier lips.

xo,
kristie

Monday, August 25, 2014

Double Color Bronzing Technique


bronzing is such an essential part of a summer face. well, any face really. for those of us who are past our twenties and looking to add color to our sleep deprived, care deprived and all around deprived skin, this is your solution. better than any amount of diet coke. promise.

so it is with great pleasure that i am going to share with you my favorite bronzing tip:

use two colors.

yes, it is as simple as that. let's imagine you are painting a picture of the sky. do you use only one color blue to create the depth and beauty of that vast escape? no, you use as many colors of blue as you can. so when you apply your bronzer, why would you only use one shade? adding a cream blush under your bronzer will help give it depth and a touch of sun kissed glow without the fake-ness of highlighters and shimmers. it is essential that you use a cream blush for this technique. it is going to apply a stronger color as well as really 'grab' your bronzer once you apply it. remember, cream and powder are a marriage made in heaven.

below are the amazing cream blush and powder i have been using this summer courtesy of Make Up For Ever. you should know by know that i am a MUFE junkie and refuse any other foundation but their cream blush and bronzing powder a true winners as well. the essential ingredients to a good bronzer is lack of shimmer and a slightly grey undertone. done and done. the cream blushes come in a variety of shades to match your needs and they have amazing pigmentation and last for. ev. er.


so ladies (and some gentleman) shared below is one of my favorite makeup-ing tricks:
 hope that helps you in your bronzing journey!

xo,
kristie

Thursday, June 26, 2014

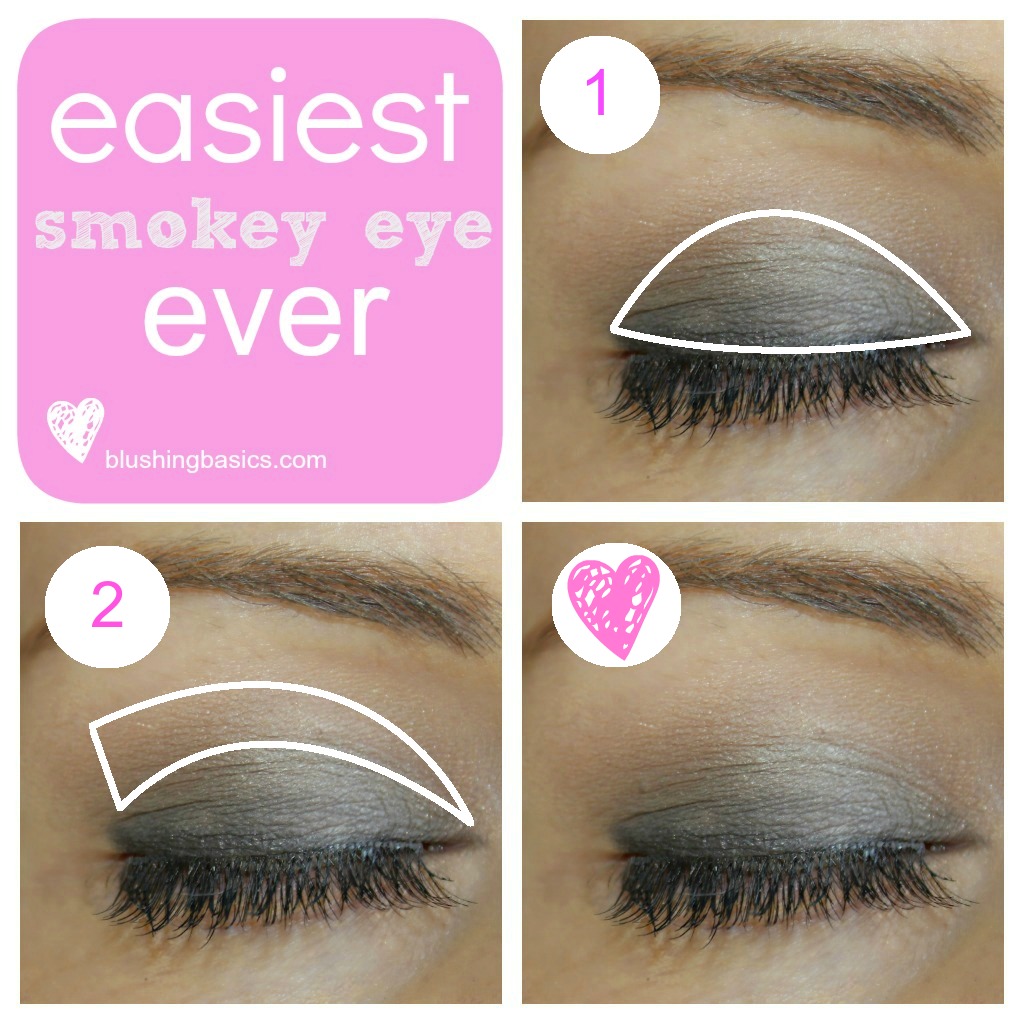
Easiest Smoky Eye Ever


who doesn't love a smoky eye, or a smokey eye (tomato, tomahto). if you are a makeup rookie or an old hat at makeup, you can always make use of the smoky eye technique. quite simply this is the easiest, fastest, error proof way to get your smoky eye. using only two products, an Aqua Shadow in 4E (grey) and a medium brown shadow for blending:


summertime is the time of year i bring out my Make Up For Ever Aqua Shadow because of its ability to stay on under pressure, underwater and under duress (sweat). that is some amazing eyeshadow. a go-to during the summer months every makeup bag should hold one of these Aqua Shadow sticks.

follow this step by step eye makeup tutorial to create your easiest smokey eye ever:
  1. apply grey shadow stick to eyelid from lashline to crease
  2. blend grey using the medium brown eyeshadow
  3. done!


xo,
kristie

Thursday, May 29, 2014

Fight Allergy Symptoms With ZYRTEC®

this is a sponsored post written by me on behalf of ZYRTEC®

when allergy meets beauty my husband (Tman) and my world's collide. he's an Allergist (i.e. physician who writes you those glorious allergy scrips) and i am a Makeup Artist (addict, lover, over-user, etc.). he does his best to keep your eyes dry, your nose less itchy and your face de-puffed. i do my best to use my tools - makeup! - to help hide those symptoms. combine our superpowers and we have you covered this allergy season.


yes, the dreaded allergy season is here. grasses are growing, flowers are blooming and pollen is working its genius on the world, including us. because pollen is so effective we refer the term ALLERGY FACE®, you know that havoc allergies wreak on our faces - watery eyes, puffiness and red nose? yeah, that is ALLERGY FACE® and it is a fate you don't want to meet. however it is often unavoidable and in that case i have put together a post sharing some of my favorite allergy season beauty tips.

MAKEUP TIPS TO AVOID ALLERGY FACE®

  • invest in some ZYRTEC® !  ZYRTEC® is an allergy medicine that is used to treat allergy symptoms. it works and it works well. enough said.
  • change up your makeup game. makeup artist Jamie Greenberg recommends going for a smoky eye to hide the puffiness that sometimes results from allergies. black is concealing in not just clothing but makeup included.
  • apply concealer to your T-Zone, across the forehead and down to the nose. this makes skin less dull and removes redness from that area.
  • stay away from fiber-sculpting mascara. i know it is the hot makeup item right now but you would be best benching that sucker until your allergies are calm.
  • a green concealer works well to combat redness. gently dab a small amount over the red areas of the face followed by a skin-toned concealer on top. dust lightly with powder to set.
  • if the area around your nose is super rosy apply a red or pink blush to the apples of your cheeks and dab a small amount of concealer over the redness of your nose.
check out the video below featuring makeup artist Jamie Greenberg and her allergy season tips:


these tips will help keep you fresh faced and fabulous during allergy season. i'd love to hear how you stay fresh faced during allergy season - sound off in the comments!

xo,
kristie

this is a sponsored post written by me on behalf of ZYRTEC®

Tracking Pixel

Tuesday, May 13, 2014

Rimmel Makeup Looks at SoFabCon

I am a member of the Collective Bias®  Social Fabric® Community.  This shop has been compensated as part of a social shopper amplification for Collective Bias and its advertiser.

last weekend was spent at SoFabCon14, a blogging conference put on by #CollectiveBias and its blogging division, Social Fabric. in attendance were some amazing food, lifestyle, parenting and beauty/fashion bloggers. while the sessions were amazing some of my favorite moments happened during the breaks where we could visit brand salons. naturally my favorite brand salon was the Rimmel room where you could get amazing makeup looks in an instant.

my go to station was the Rimmel Show Off Lip Laquer station. included at the station was a complete lineup of all of Rimmel's show-stopping, holy grail of glosses Show Off Lip Lacquer. though it may seem simple (you might be thinking, how difficult can lip gloss be?) getting good gloss has a technique! giving lips depth, color and fulness takes a little layering and positioning. at this station i had the gorgeous makeup artist Brooklyn (@lovelybrooklyn4) to teach me the ways of lip glossing.


first, you want to begin with a great product - thankfully Rimmel had that problem solved. prior to the conference i picked up a few Rimmel products from Walmart to keep me looking good. i decided on two colors: Nude Eclipse and Nova.


starting with a clean slate you apply your brightest shade over your entire lips. the strong color of the Rimmel Show Off allows for smooth straight lines and the longest lasting pigment. follow that with a lighter color applied only to the center of your lips. finish by blending the two shades together and voila! perfect lip color. how's that for #beautyinspiration?


xo,
kristie


Wednesday, May 7, 2014

Packing For SoFabCon - Makeup Looks

I am a member of the Collective Bias®  Social Fabric® Community.  This shop has been compensated as part of a social shopper amplification for Collective Bias and its advertiser.


i am so excited to be getting home from Hawaii just in time for the #cbias #SoFabCon14 beginning tomorrow! after all of my swimsuits and beach wear was unpacked i accessed a completely different portion of my closet and makeup to prepare myself for a blogger conference. my makeup looks for this conference will be less beachy and more profesh.

so what does one pack to a blogger conference? a lot. this is your chance to really make an impression on other bloggers as well as representatives from brands that are sure to attend the conference. you want to present yourself in the best light possible. sure, the invite says business casual but that doesn't mean business frumpy. you want to pack clothes that are versatile, mix and match and are a classic. you want to stand out but not for the wrong reasons, so leave your neon romper at home and stick to more contemporary colors.


i think the biggest dilemma bloggers (particularly beauty bloggers) face is what makeup to pack? when i travel i typically pack light when it comes to makeup. i want just the basics, however in this case i would recommend packing heavy. and by heavy, i mean good foundation, mascara, eyeliner and blush. those are the backbone of any makeup look and you want to be sure you have them all.

second, continue to keep it classic. save the fancy makeup looks for nights out with your girls and keep your makeup classic. while a super dramatic cat eye looks great in photos, it can be a little daunting in person. sticking to classic makeup, a strong eye and a bold lip will never be out of style and is gorgeous and approachable. exactly what we're going for!

i couldn't attend SoFabCon without first packing my trusty StayMatte Foundation by Rimmel. this high coverage foundation will take me from day to night at the conference and keep me fresh faced. this drugstore foundation found at Walmart is not only good, it is inexpensive which makes it even better for traveling. if it gets lost, spills, or crumples under air pressure, a replacement is only a short drive away.

my other must have from Rimmel is one of the best drugstore mascaras on the market. the Rimmel Scandaleyes mascara gives your lashes that extra oomph they need to make a serious first impression. just what the doctored ordered for a blogging conference because you'll be making A LOT of first impressions.


i'd love to hear what your conference packing makeup must-haves are. what #beautyinspiration do you follow? does Rimmel make it in your bag as well?


xo,

kristie


Monday, May 5, 2014

Makeup Tip For Lipstick

sometimes when i apply my lipstick or lip liner i accidentally make a weird bump or squiggle on my lip that looks unnatural. cleaning up that error can be a little difficult if you have already applied your foundation. or, have you ever tried to wipe away RED lipstick? let's just say it's not easy.

this weekend i was able to attend a MAC Pro seminar and i learned the coolest trick for applying lipstick. if you smudge, do not fear. just use an angled brush like the MAC 266.

wipe the tip on a moist towel, such as a makeup remover towelette or baby wipe. it's just enough moisture to remove the lipstick without being messy. take your angled brush and just brush over the offending smudge. it should wipe right off. when finished your lips should look perfectly lined.

xo
kristie

Wednesday, April 30, 2014

The Secret to Sea Salt Spray


i just received the latest shampoo, conditioner and sea salt spray offered by the Drybar. i love the Drybar products because they really know how to 'do' hair. i was particularly pumped to give the sea salt spray a try because tousled, beach hair is not only super hot right now, it is my go-to look for summer.

the question is, how do you use sea salt spray (without ending up with a frizzy, hot mess on your head)? here's my tips for getting the most out of your sea salt spray.


first you are going to begin with blow-dried hair. it may sound backwards but if your hair is anything like mine, when it air dries it dries into pure frizz. i don't care hair much serum you put on this mop, the natural kink takes over and frizz city pops up. i want my beached out hair to look 'perfectly tousled' which actually takes a little bit of work. so please, blow dry away.


second, you are going to add your sea salt spray. i am using the sea salt spray by Drybar. it smells amazing, adds just the right amount of texture and coarseness to your hair and leaves you look tousled without the frizz. add your spray until hair is damp.


next you are going to scrunch the heck out of that hair. don't be shy. take your hands and scrunch till you can't scrunch anymore.


last, let the remaining moisture evaporate and you are left with textured, wavy, beach-y, gorgeous hair.

xo,
kristie

ps. here's your 'pinnable' image if you're interested:


Tuesday, April 29, 2014

Skincare School


you may know that i am a RoC Skincare Ambassador but please don't think my opinions are biased. i am serious about skincare. skincare is one of the fundamentals in beauty and knowing how to treat your skin - what products to use and when - are the hammer and wrenches of your skincare toolbox.

thankfully RoC has put together an online skincare RoC ACADEMY to teach you about the skincare fundamentals, i.e.: the aging process, the story of retinols, etc. these are all things what will help you learn how to treat your aging skin appropriately. something we could all benefit from!


fact: slowing cellular turnover is part of the again process. it causes skin to appear dull, dry and uneven.

fact: fluctuating hormones can cause skin to produce less oil and make it dryer.

fact: it can take up to twelve weeks to see meaningful results in skincare.

these are just a few of the gems you will learn over at the RoC Academy. i think it is worth the few moments and let this be my PSA - the more you know…

head to the RoC Academy HERE for your chance to learn more. additionally, once you finish the course you qualify for high value RoC coupon that you don't want to miss.

xo,
kristie

Sunday, April 27, 2014

How To Get The Perfect Cat Eye 'Flick'


alright, let's do this. liquid eyeliner and the cat eye 'flick' are two of the most requested step by step makeup tutorials. learning these two techniques will give you the foundation for makeup mastery.

here is how it is done:

  1. draw a dot at the highest point where you would like your cat eye 'flick'. i do this with my eyes open so that i can see where the flick will actually be, rather than doing it with your eyes closed and your eyelid stretched.
  2. draw a dot at the base of where you want your cat eye flick to be.
  3. connect the dots.
  4. draw the remaining eyeliner across your eye and adjust thickness to desired width.
enjoy your cat eye!

xo,
kristie

Monday, April 7, 2014

Day To Night #BeautyInspiration Tutorial

I am a member of the Collective Bias®  Social Fabric® Community.  This shop has been compensated as part of a social shopper amplification for Collective Bias and its advertiser.
as a mom my goal is find ways to make my 'get ready' routine quicker and easier. i like wearing makeup and i like getting dressed up, however convenience and time are always an issue. finding products that will do double duty, last all day, or cut down on maintenance time are essential. finding this new Stay Matte foundation from Rimmel has been a game changer.

apply it in the morning and once evening rolls around it will still be fresh. Rimmel Stay Matte is no joke.

to make my days and nights a little simpler, i've created this Day to Night tutorial for #CollectiveBias showing how you can go from 'fresh faced' to smoldering without doubling your steps.


begin by applying your morning makeup. my morning makeup routine always includes the following: foundation, mascara, blush & lip gloss. other elements are always optional but those four always make the cut.

evening is where it becomes a bit more complicated. it is the extra steps that bring on the wow factor, and these extra steps are worth the time. first, contouring is a must. adding some extra bronzer to your hairline, cheek bones and neck will give your face structure more depth. define your brows. adding definition to your eyebrows will bring more interest to your eyes, which is basically the area you always want to draw attention to! a little eyeshadow in the crease will help to give your eyes more smolder and eyeliner will help make lashes appear bolder and longer. add some concealer for porcelain skin and define your lips to create some pout. your day to night transformation is complete.


these products below are honestly going to save you time and money. head to your local Walmart to find your #BeautyInspiration match.


they can be found at this display:


to celebrate their 180 year anniversary Rimmel is offering a giveaway that you don't want to miss! 25 readers will be selected to win a gift basket filled with Rimmel product valued at $50. the odds are forever in your favor, so you should definitely give it a go.

lucky or not you can find $1 off coupon in the Sunday newspaper for each of the two products mentioned above. that helps make an affordable product even closer within reach.


a Rafflecopter giveaway

xo,
kristie


NO PURCHASE NECESSARY. The Coty® Rimmel® Giveaway starts at 4/2/14 at 12:00 A.M. (midnight) ET and ends on 4/25/14 at 11:59:59 PM ET. Open only to (i) members of the Social Fabric community, (ii) legal residents of the fifty (50) United States, the District of Columbia, and (iii) who are at least 18 years old at the time of entry. Click here for Official Rules and details including how to enter, entry criteria, prizes and restrictions, etc. Void in PR and where prohibited. Sponsor: Collective Bias, Inc.

Wednesday, February 5, 2014

Beauty Bloggers' Top 10 Products


this last week i headed to Facebook to crowd-source the top beauty bloggers and find out what their favorite, must-have, holy grail products were. below is a list of the top ten beauty products that beauty bloggers can't live without:


My Beauty Bunny

Jen from My Beauty Bunny recommends DermOrganic Leave-In Treatment with argan oil. 'The Leave-In Treatment helps speed up blow drying time and it gives me amazing shine.'


Beauty 101 Blog

Casey from Beauty 101 Blog swears by Hourglass Femme Nude lip crayons. 'Yes, they're pricey at $30 a pop but considering the fact that these are by far one of the most perfect lip products on earth $30 is a small price to pay for perfection.'


The Fabzilla

Kath from The Fabzilla lives for Hourglass Liquid Powder Foundation. 'So what makes it sound like it's a manna from heaven then? LIQUID POWDER {all in caps for emphasis}. It's liquid but dries to a matte finish, yeah like a powder!'


Beauty Tidbits

Harshleen from Beauty Tidbits is in love with it Cosmetics Vitality Lip Butters. 'These lippies are sheer, shiny yet color-rich and very easy to wear anytime for a naturally pretty flush of color. All the three shades are universally flattering, fresh hues that would look great on all skin tones.' 


Prime Beauty Blog

Cindy from Prime Beauty Blog is hooked on the Pixi Wide Awake Crayon Combo. 'Bottom Line: Every over 40 woman's best friend! Look wide awake and rested with the fab crayon that doesn't tug, pull or wear off!'


Beauty 411

Nancy from Beauty 411 swears by Giorgio Armani Luminous Silk Foundation. 'I've never found a more perfect shade match (shade 5), a foundation that looks so natural and one that feels like I'm not wearing makeup.'


Polish Insomniac

Jessika from Polish Insomniac is a big fan of Skin79 BB Cream. 'It is very thick and creamy and my dry skin drinks it right up.  It has very good coverage and I usually don’t even need concealer.'


Beyond Beauty Lounge

Mercedes from Beyond Beauty Lounge is in love with Tarte Amazonian Clay Foundation. 'I am happy to say tarte came through with this one and it lives up to all of its claims. I have worn this foundation all day to work and into the evening with no touch ups or powder needed. it successfully kept the oil at bay.'


My Newest Addiction

Laura from My Newest Addiction literally fell in love with Guerlain Meteorites. 'It can be used to give a glow to the areas you want to highlight or give a luminosity to your skin. Beautiful packaging, gorgeous finish, and WOWZA! The smell of these is just glorious.'


Retrodiva's Beauty

Meredith at Retrodiva's Beauty is a firm believer in Clé de Peau Beauté Concealer. 'But since finding the Clé de Peau Beauté Concealer, I haven’t been happy with any other. The investment is worth it, as you don’t need much product to get the effect you need, and one tube will last for ages and ages...'

i have found a lot of new products to add to my wish list. time for some shopping:


xo,
kristie

Thursday, January 16, 2014

Stila Stay All Day Liquid Eyeliner


every once in a while i try a product that i love so much i kind of want to shout it from the rooftops. i guess featuring a single product in a single post is my way of showing you just how amazing i think this one product is.

a while ago i had a friend recommend this eyeliner to me, raving about its ease of use, its long lasting qualities and its virtually fool proof application. having used eyeliner pens before i had my doubts. eyeliner pens are notoriously expensive for cost of use vs. product life. often they will dry out quickly, or the ends get mucked up making it impossible to get that precision point you want. i finally bit the bullet and invested $20 in a Stila stay all day liner.

$20 for an eyeliner. crazy talk, right? i know, i thought so too, until i used it.

the Stila stay all day liner does exactly what it promises. it stays all day without smudging. the pen tip is the perfect shape for making a cat eye or applying with ease. even when i used this eyeliner before heading to the beach in Kauai (please spare me the judgement of wearing eyeliner to the beach, i'm addicted) i returned home to find it still perfectly placed on top of my lashes allowing them to look thicker and fuller with more definition of my eyes.

have i convinced you yet? if you are looking for the perfect eyeliner, the price tag is a bit steep but i promise you it is worth it. at least you'll earn some points if you purchase this at Sephora, right?

xo,
kristie

Monday, December 30, 2013

New Years Countdown #6 How To Apply Eyeliner

How To Apply Eyeliner made the top ten posts of 2013 countdown because pencil eyeliner is notoriously easy yet difficult. easy to apply but to a stinker to get perfect. here are some tips below to guide you to that perfection.

here are some basic tips to help you apply your pencil eyeliner with precision! i tend to avoid pencil liners as i like the preciseness that liquid liner gives you, however occasionally i step outside my usual routine and use some pencil action. the great thing about pencils is that you have so much versatility with application. you can apply as thick or thin as you like - combine that with a little smudging and you can create all sorts of eyeshadow shapes. liquid eyeliner isn't as friendly with mistakes or blending.

tip one:

hold up eyebrow while applying. holding your eyebrow makes your eyelid skin taught, allowing pencil a smoother canvas to draw on.

tip two:

i sometimes cringe when i look in the mirror and see i've skipped that strip of skin directly above my lash line. usually it's not bad but if you apply in a hurry, that strip of skin looks like Moses parted the Red Sea. take a quick second to draw downwards to ensure that no skin peeks through.

tip three:

if you are going for drama then leave your pencil line as is, but more often than not a smudged pencil line looks more flattering. it blends the eyeliner into your shadow and looks like a more savvy makeup application.

if you have any additional tips for pencil eyeliner application, i would love to hear.

xo,
kristie

pin this image to see all tips in one place!

Tuesday, December 10, 2013

Mary Kay Holiday Makeup Looks


i was thrilled when Conde Nast contacted me to try out some of the beautiful holiday makeup looks from Mary Kay. i am a Conde Nast Influencer and from time to time we get to participate in special promotions like this one. a few days after being selected a box filled to the brim with Mary Kay goodies arrived at my door.

my challenge was to try out the holiday looks that can be found in December's Glamour, Allure and Self magazines. definitely up to the challenge i wasted little time unwrapping all of my new 'toys'.

the Mary Kay holiday look i found most appealing was a natural look featuring a purple eyeshadow. the holidays are a fun time to experiment and be bold, but let's be honest, these pictures are going to be in photo albums viewed for a lifetime and i would rather have a classic look than a contemporary one.

i am a big proponent of the Mary Kay makeup. their products work well, last long and are affordable. some of my favorites include their mascara - amazing, and their liners: lip, eye and brow. the mascara applies without being too gloppy and their pencil liners are so smooth but don't break easily. have i mentioned the compacts?! they're portable and house a variety of products making them the perfect travel accessory or quickly pack into your purse for a night out.

below is the look i recreated with my new products but you can see the original look on MaryKay.com:


xo,
kristie
Header